


January 19, 2023
How to Check Storage Space on Mac
Trying to download a file but don’t have enough room? Curious as to what is taking up the storage space on your Mac?
When it comes to keeping your Mac working perfectly, having enough storage is a key component. By knowing how to check the storage space on your device, you can make sure that you always have room for the important things.
Here are all the things you need to know to check your Mac Storage space:
- How to check Mac storage space
- How to delete things to create more disk space on Mac
- Other ways to get more storage on Mac
- Tips for keeping used space on Mac low
How to check Mac storage space
From 2012 onwards, Apple released Mac devices manufactured with faster, more reliable Solid State Hard Drives (SSD). However, while SSDs are more efficient compared to its predecessor, Apple made it so MacBooks which use them are no longer upgradeable.
For this reason, when you purchase your Mac, it's important to make sure that you anticipate how much storage you think you’re going to use for the entirety of its lifespan or risk poor performance.
Thankfully, it is possible to extend the lifespan of your Mac by making sure you regularly clear its storage of unnecessary files or investing in a Mac cleaner. Here’s how to find out how much disk space is being used on your Mac and to see the size of your hard drive:
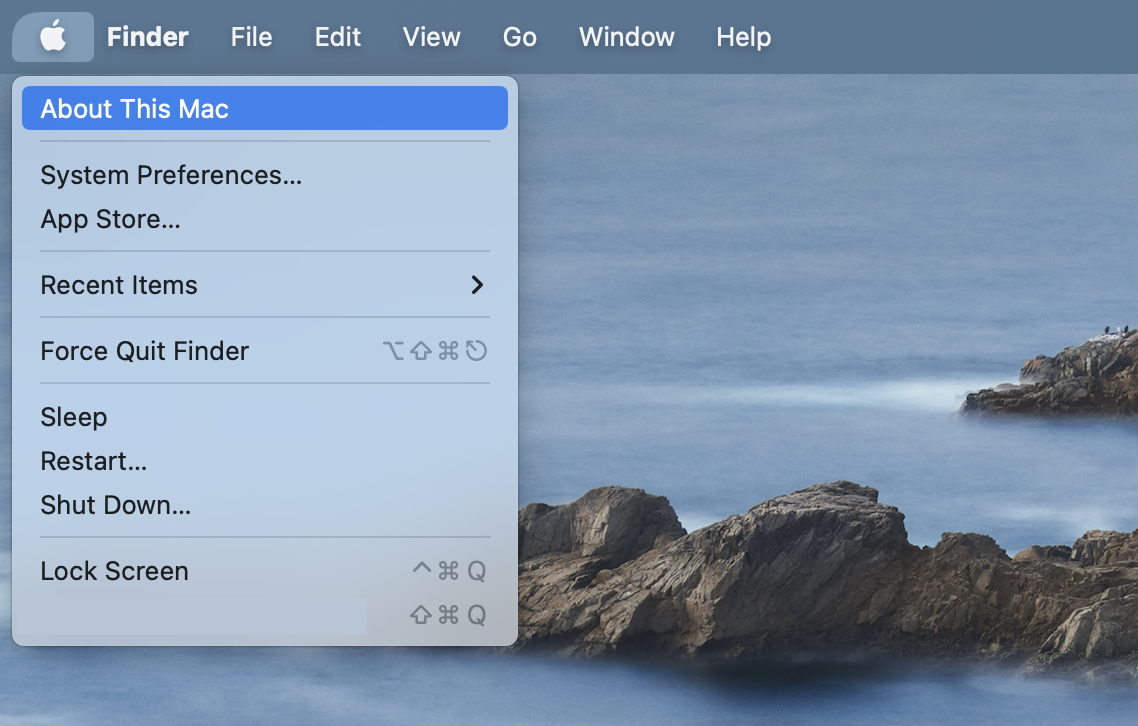
- In the upper left-hand corner of the screen, click the Apple icon.
- On the drop-down list, select About this Mac.
3. Click Storage. While the advertised flash storage will be displayed on the left side of the pop-up, the actual storage size below Macintosh HD.
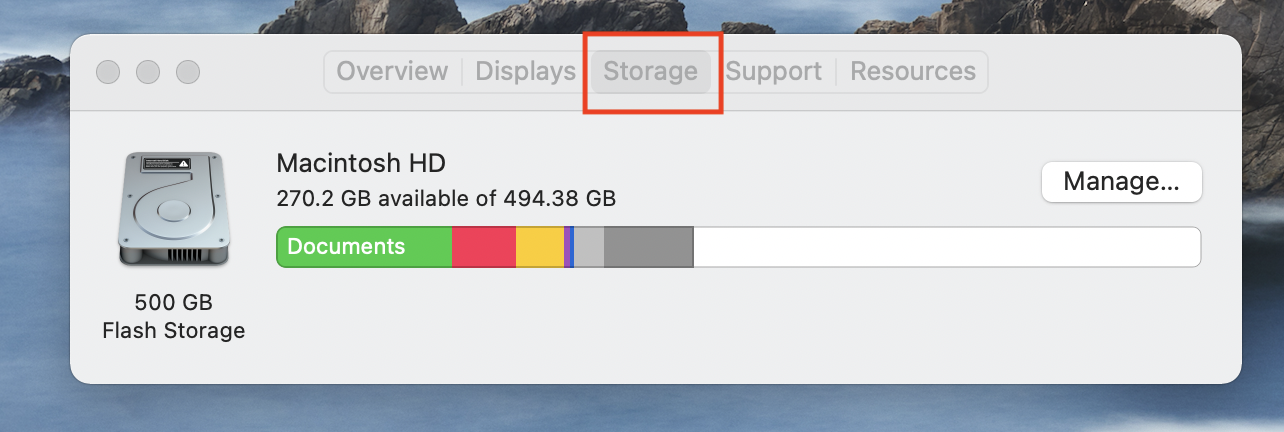
For example, due to an industry-standard way of measuring the size of the drive, your device can have an advertised 500 GB Flash Storage, but the actual storage size is 494.38 GB.
4. On the Storage tab, a color-coded bar will display what is taking up your Mac’s disk space. You can also hover your mouse over the color-coded sections to see more information.

For many Mac users, there is often a gray section on the right-side of the colored bar, which takes up a bulk of the storage. This section includes files essential to your macOS, such as system data.
Depending on how full your storage is, it can take a few minutes for this bar to load and display your information correctly.
5. Alternatively, if you wish to know more precise details about how the storage on your Mac is being utilized, select Manage.
 6. On the left sidebar, you will have information on different categories and how much storage is used for them.
 Many experts recommend checking Mac storage regularly to avoid reaching the maximum storage to maintain optimal performance. When a Mac storage is too full, it can lead to your device freezing, apps crashing, or your device slowing down.
How to delete things to create more disk space on Mac
Some of the most common sources of full storage issues include games with heavy graphics, apps with numerous hidden log files, time machine backups, and media files.
If you find that your Mac is showing signs of issues related to a full storage, you may want to take the time to free up disk space. Here are some of the best ways how to make more space on your Mac:
- In the upper-left corner of the screen, click the Apple icon.
- On the drop-down list, select About this Mac.
3. Select Storage.
4. Click Manage.
5. On the System Information Screen, you have four main recommendations: Store in iCloud, Optimize Storage, Empty Trash Automatically, and Reduce Clutter.
 If you want a quick way to make sure your storage never gets out of hand, you can go through each of these options and update your preferred settings.
6. On the menu bar on the left side, you can also select the category which uses a lot of storage. For example, you can click Applications.

7. To be more efficient, you can organize the files or apps by file size by clicking the arrow button to the right of size. Once the arrow points downwards, the files will be ordered from the largest to the smallest.

8. From the displayed list of apps or files, select what you no longer use or need.
9. On the lower-right part of the screen, press Delete.
 10. Afterward, repeat the same process for the other categories as well.
Other ways to have more storage space on your Mac
Mac devices are known to lose a lot of storage space to regular OS updates. Within a few years of regular use, it’s possible for these OS updates to take up a good chunk of your limited, physical storage space.
On the other hand, it’s also common for your storage needs to change with time. If you tend to use your device for things like work or school, its regular use may add
In general, if you need more storage on your Mac, here are some of yours options:
- Purchase a new Mac
- Buy an external hard drive
- Invest in cloud storage solutions
How to use iCloud to free up storage space
iCloud is a great way to offload some files from your Mac onto the cloud and free up some space. Let’s take a look at how to take advantage of iCloud and the features that it offers.
- In the upper-left corner of the screen, select the Apple icon.
- Click System Preferences.
 3. On the right side of the pop-up, select Apple ID.

4. On the left side bar, select iCloud to see the apps synched on your devices with iCloud.

5. At the bottom of the screen, check the box next to Optimize Mac Storage. With this, iCloud will only use to store your documents online when necessary.

6. You can also choose to add more or fewer apps to your iCloud account. To do this, check or uncheck the boxes next to app name. This will allow your data to be synced to other devices that you own under the same Apple ID.
How to use iCloud to store photos
Alternatively, you can also use iCloud to store our photos and help reduce the amount of space they take up locally on our Mac. Here’s how you can do this.
1. Open the Finder app and type Photos.

2. Launch the Photos app.
3. Click Photos.
4. Select Preferences.
5. Next to General, click iCloud.
 6. Next to Optimize Mac Storage, click the radio button. With this, iCloud will free up space on your Mac by replacing your photos with a smaller resolution version.
 It’s important to keep in mind that once you select this option, you will need the internet to see the full-resolution version of your photos.
Aside from iCloud, there are plenty of cloud storage solutions, which you can use for your digital storage needs. Some popular cloud storage solutions include Google Drive, OneDrive, and Dropbox.
Tips for keeping used space on your Mac low
If you’re keen on preventing your Mac from reaching full storage for longer, here are some easy tips and tricks to make it happen.
- Empty your Trash folder regularly on your Mac.
- Delete conversations from the Messages app from time-to-time. Often, there can be pictures and videos in there that you may no longer need.
- Go through your Downloads folder and delete anything from within there that you no longer need to have access to.
- Clean up your system by deleting files that you no longer need access for.
- When it comes to media files, videos and pictures usually take up more space than documents or music files. For this reason, it is more efficient to go through these files first when deleting.
On the other hand, if keeping track of your Mac storage is too difficult for you to do manually, you can also invest in third-party tools to do this for you and more.
Use third-Party Mac cleaners
Designed to optimize and clean your Mac, a third-party Mac cleaner comes with a variety of features, which can improve your device’s overall performance.
For example, Mac cleaners like MacKeeper remove unwanted files and apps, repair corrupted systems, and even offer additional protection for things like malware and privacy protection.
Here’s how you can use MacKeeper to safely clean up your Mac today:
- On your Mac, open the MacKeeper app.
- Click Safe Cleanup.
- Select Start Scan.
 4. Wait for MacKeeper to scan your Mac for unnecessary files.

5. Review files for deletion. If you’re having second thoughts deleting a particular category, you can simply uncheck the box next to it.

6. Click Clean Junk Files.
With MacKeeper, you can keep your Mac running smoother for longer with less effort. In just a few clicks, you can clear your Mac storage easily.
Content Manager for the MacUpdate blog
Ruslana is a passionate Mac admirer and tech writer with 5+ years of experience in Mac support.