


May 25, 2024
How to Recover Deleted Photos on Mac
Photos hold an irreplaceable value, and the mere idea of losing them can be unsettling. Yet, accidents happen, and you might find yourself without access to these cherished memories due to an unintended deletion or a system glitch.
Despite the robust protection against hardware and software malfunctions that Mac devices offer, data loss remains a possibility. In fact, losing photos on Mac computers is a frequently encountered problem. To tackle this, the article outlines practical techniques for retrieving deleted photos on Mac systems.
How do Photos Get Deleted on Mac?
In addition to unintended erasures and technical issues, a variety of other factors can also result in the loss of photographs. Here I've outlined the typical photo loss scenarios to assist you in protecting your cherished photo memories on your Mac against future losses:
- Accidentally deleting pictures from the photo app.
- Deleting a photo folder from the Finder app.
- Accidentally formatting partitions on your Mac that contain photos.
- Resetting Photos app without taking backup.
- Presence of malware or viruses from untrusted sources on Mac systems.
- Losing photos due to image corruption.
Factors that Effect Photo Recovery on Mac
1. Time from the Point of Deletion
The longer the period after deletion, the higher the chance that new data will overwrite the deleted photos on the storage device.
2. Storage Type
The storage medium, such as SSDs, HDDs, or USB drives, plays a crucial role in photo recovery success. SSDs employ wear-leveling algorithms that can cause data to be overwritten faster compared to HDDs. This characteristic can significantly influence the outcome of recovering lost or deleted information.
3. File Fragmentation
When photos are deleted and their data is scattered across the storage device, piecing them back together for recovery becomes a more intricate process. Recovering fragmented files completely is a challenging task because the pieces of the file are not stored in one place.
4. Availability of Backup
Maintaining a backup of your photos increases the likelihood of a successful recovery. By regularly backing up your data, you secure a duplicate of your information, safeguarding it against unforeseen deletions or loss.
5. Photo Recovery Software Capability
The performance of your photo recovery software significantly impacts its success. Tools with cutting-edge algorithms tend to have higher recovery rates. Opting for software that has earned positive reviews and a good reputation can boost the likelihood of successful data retrieval. Moreover, the breadth of file systems and image formats the software supports is equally important.
Best Solutions to Recover Deleted Photos on Mac
In the following section, I will lay down the most effective techniques to retrieve deleted photos on your Mac. Employing one of these methods, you stand a good chance of restoring your lost images.
Method 1: Restore Photos on Mac from Recently Deleted Folder
If you've deleted photos while using iPhoto or the Apple Photo app, check the Recently Deleted Folder. Photos and videos you delete stay there for 30 days, giving you the chance to easily recover them with a few straightforward steps.
Step 1: Navigate to the Photos app and open it.
Step 2: From the left sidebar, click Recently Deleted.
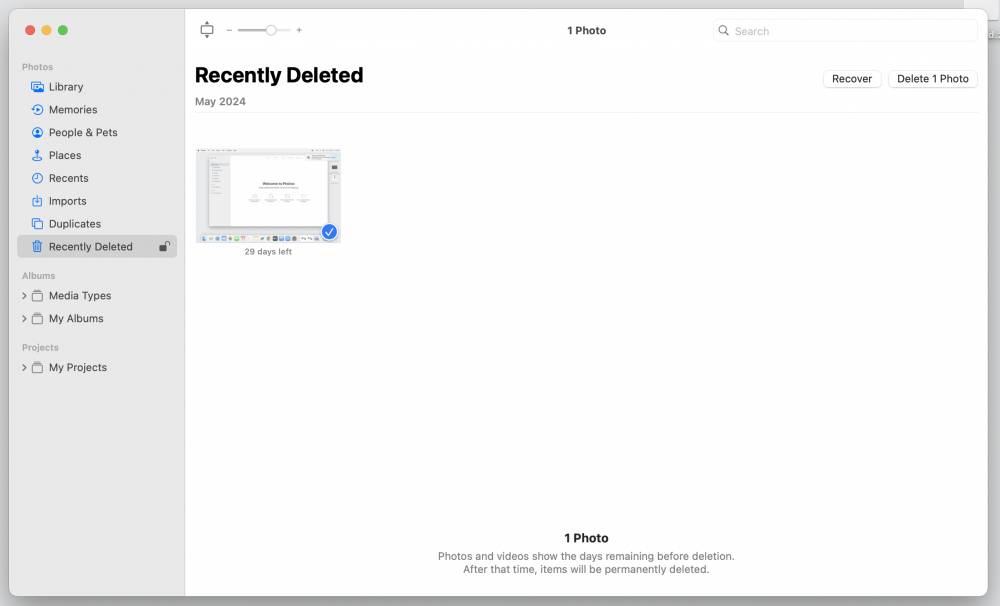
Step 3: Choose the images you wish to recover. When a photo is selected, a blue check mark appears in the thumbnail's corner.
Step 4: Then, proceed to click the 'Recover' button located at the top-right corner. Once completed, the photos will automatically save to their initial location.
Method 2: Restore Photos on Mac from Trash Bin
If you can't find your photos in the Recently Deleted folder or they were removed from some other app, check the Mac Trash Bin next. This folder holds files and folders you've deleted for up to 30 days, or until you empty the bin yourself. To recover from Trash:
Step 1: To open the Trash, press the icon located in the Mac's dock.

Step 2: Then, look for the images you wish to restore within the deleted files.
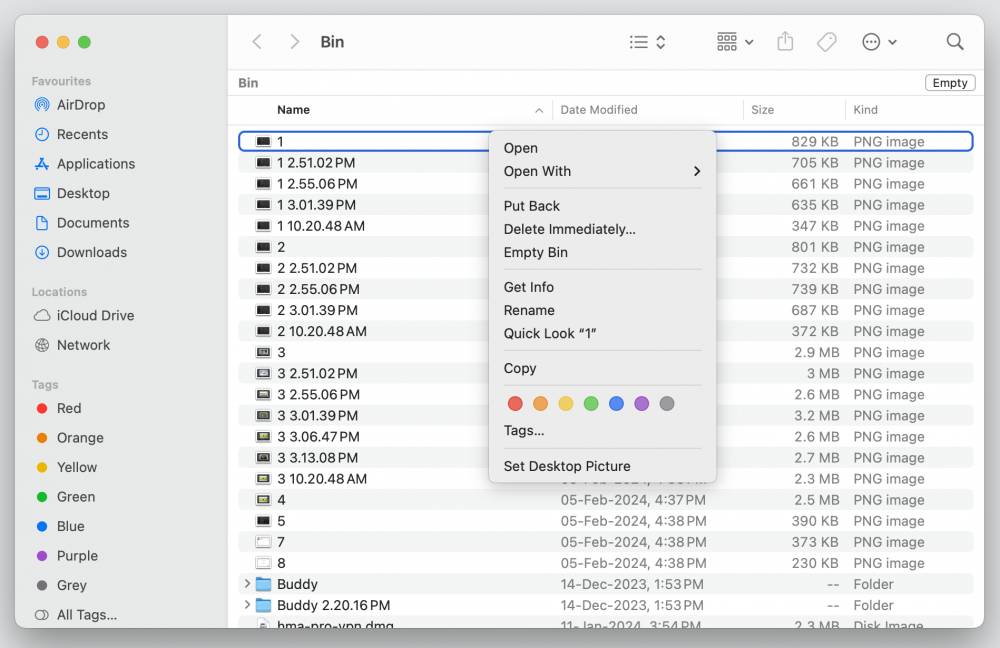
Step 3: Once found, right-click on the image and choose the 'Put Back' option. This action will return the image to its initial location.
Method 3: Recover Photos on Mac from Terminal
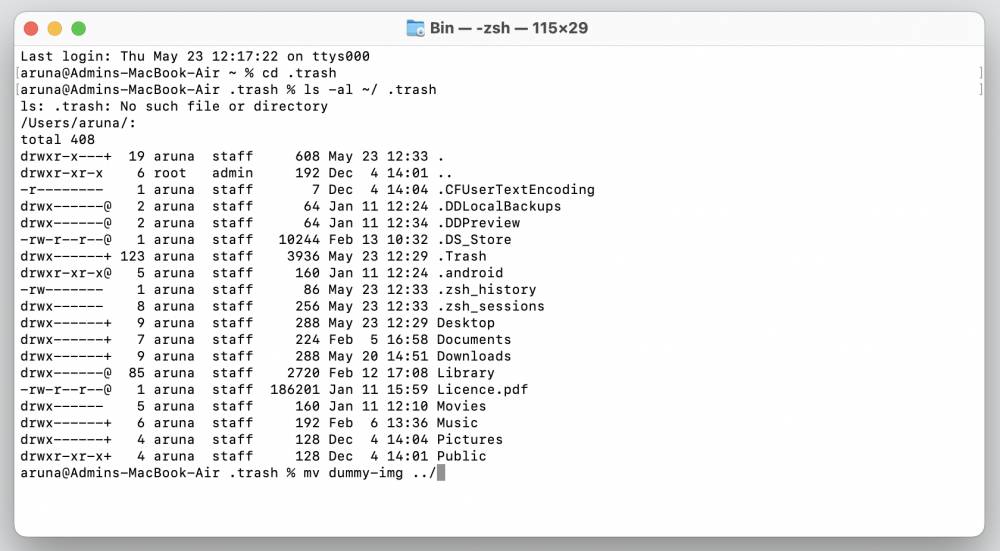
You can also use the Terminal, Mac's command-line interface, to restore deleted images from the Trash. This method is more challenging and comes with restrictions. It allows the restoration of only one file at a time, unlike recovery software that can handle multiple files simultaneously. Only use this approach if you know the precise name of the image you want to recover and be sure to designate a save location for the restored file.
To access Terminal on Mac, go to Applications > Utilities > Terminal. Once open, type in the command to retrieve your deleted photo.
Follow the steps below to start recovering using Terminal:
Step 1: Start by launching Terminal and entering cd. trash, then hit the Return key.
Step 2: Next, input mv [insert deleted image file name] ../ and press Return again.
Step 3: Now type ls –al ~/ .trash to view the contents of your trash folder.
Step 4: After that, enter Quit and press Enter to exit Terminal.
Step 5: Finally, navigate to Finder where you can find and access your recovered photos.
Method 4: Recover Photos on Mac from Time Machine
Your Mac comes with a built-in data backup feature called Time Machine. By enabling Time Machine before any data mishaps, you can easily restore lost or deleted photos. Here's how you can get back those precious memories on your Mac with Time Machine:
Step 1: Launch Time Machine.

Step 2: A list of backups will appear, each marked with a date. Select the backup that holds your photos.
Step 3: Hit Restore and hold tight until it's done.
Method 5: Recover Photos on Mac from iCloud
Once you've uploaded your photos to cloud storage, you can breathe easy knowing they're safe. Use Apple's iCloud service to keep your Mac photos in sync and retrieve any that you've deleted from the cloud. Just remember, once you delete photos from iCloud, they vanish from every device synced to it. Also, keep in mind that iCloud holds deleted photos in the Recently Deleted album for 30 days before they're permanently erased. Below are the steps to restore photos from iCloud:
Step 1: go to icloud.com and log in using your Apple ID.
Step 2: Navigate to Photos.
Step 3: From the sidebar, open the Recently Deleted album.
Step 4: Select the photos you want to recover and click on Recover.

Method 6: Recover Photos on Mac Using Photo Recovery Software
If you're unable to recover your photos through the Photos app, iCloud, or Time Machine, it means they're irretrievably gone. However, there's a ray of hope with professional Mac photo recovery software like Stellar Photo Recovery for Mac. This tool is designed to retrieve photos lost to challenging scenarios, including formatting, malware infections, or drive malfunctions.
This software enables you to recover lost or accidentally deleted images and other media files from various Mac devices including MacBook Air, MacBook Pro, iMac, Mac mini, and Mac Pro. It's also capable of scanning and recovering photos from SD cards, camera memory cards, Time Machine, Mini Disk, Fusion Drive, and other storage devices designed for Mac.
Follow the steps below to recover deleted photos using Stellar Photo recovery For Mac:
Step 1: Install Stellar Photo Recovery For Mac and launch it.
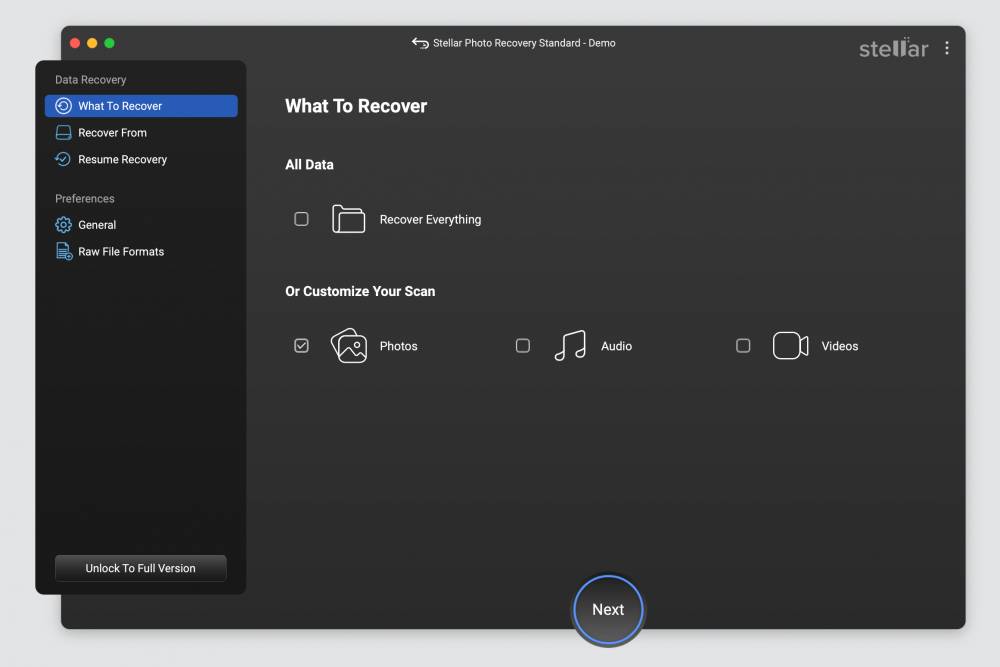
Step 2: From the left sidebar, click on What To Recover and choose the type of media you want to recover.
Step 3: In this case select Photos and click Next.
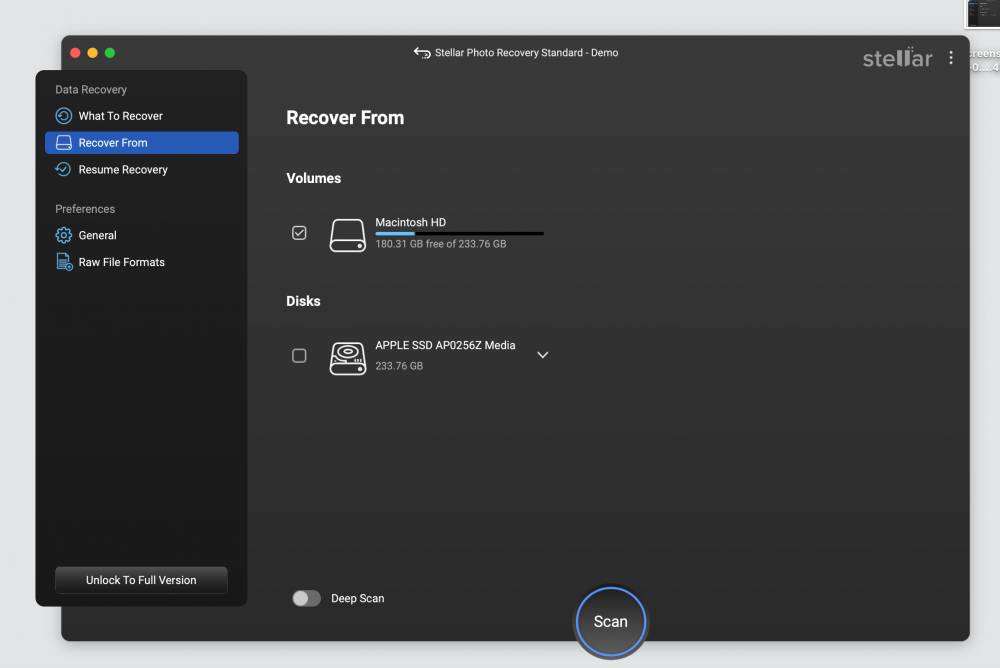
Step 4: Now select the volume you want to recover from and click Scan.
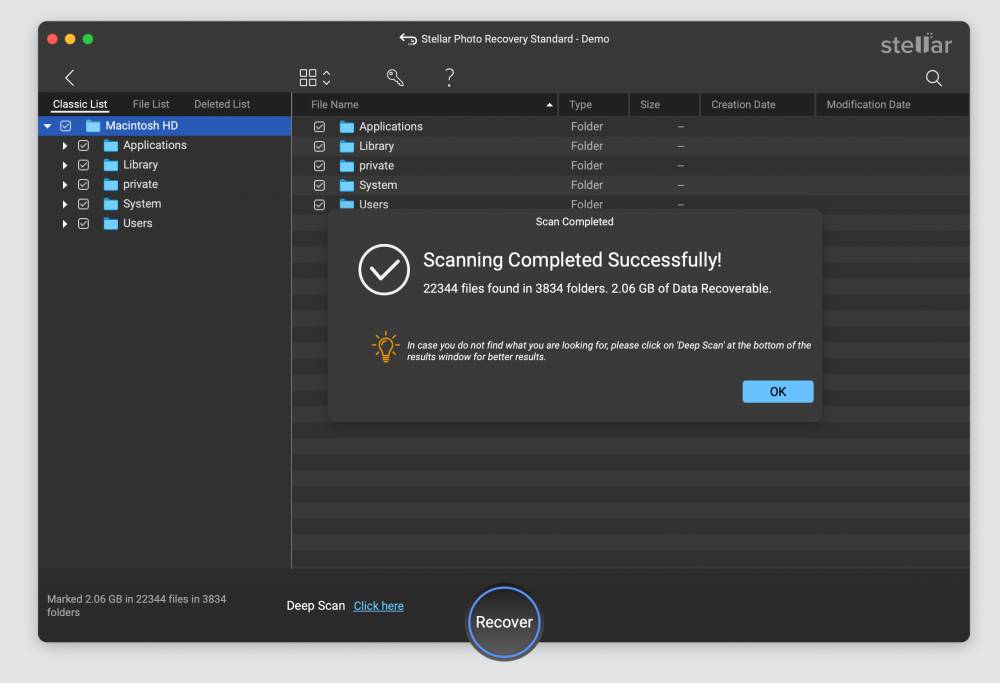
Step 5: After the scan is finished, a dialog box appears the recovered files are displayed. Click OK.
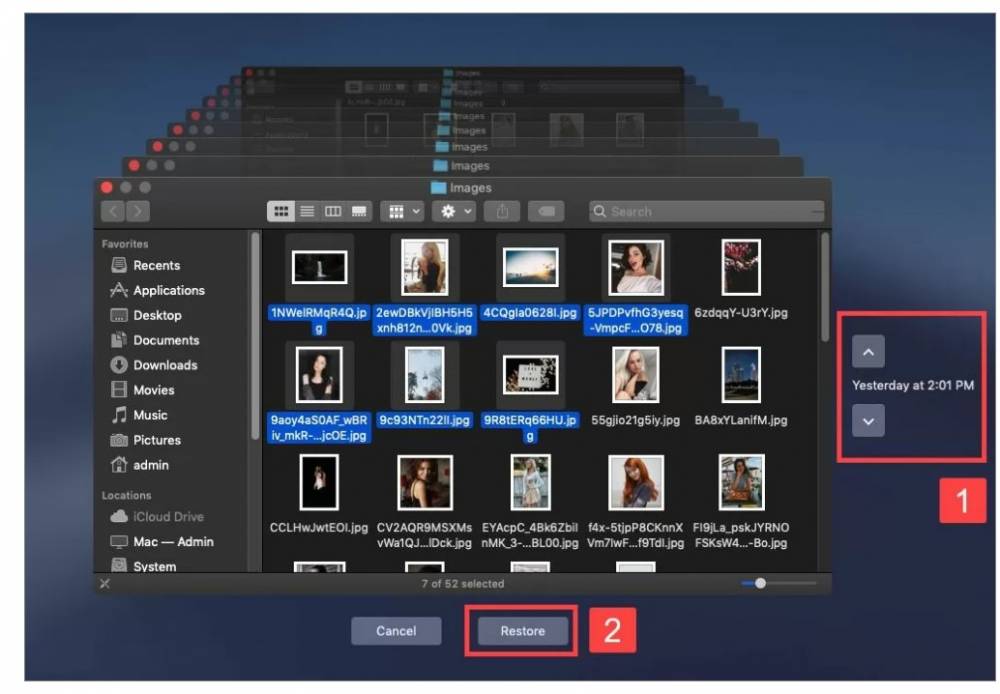
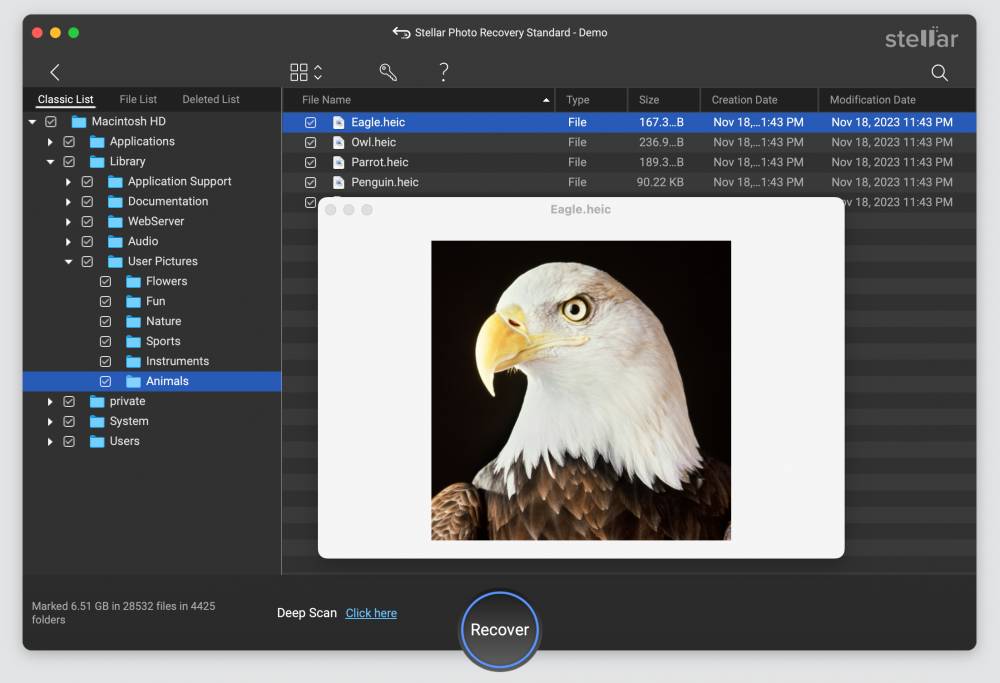
Step 6: After scanning, the software will display all the recovered photos. Preview and select the ones you wish to retrieve on your Mac.
Step 7: Click on Recover button to restore them.
Step 8: Finally, select a save location, and hit Save.
Pro tip: Remember not to save the restored images on the same volume or macOS drive where they were originally lost.
Conclusion
Discovering that you've lost or accidentally erased precious photo memories can feel devastating. However, swift action can often lead to a safe recovery. Should your photos not be backed up and have vanished from your Trash, data recovery programs are capable of retrieving them.
Stellar Photo Recovery For Mac stands out with its straightforward design and superior recovery performance. You have the option to test the application at no cost and preview recoverable items before deciding to purchase the full version. It's a dependable way to reclaim deleted photos on your Mac.
Buy from Here.
Content Manager for the MacUpdate blog
Ruslana is a passionate Mac admirer and tech writer with 5+ years of experience in Mac support.