


October 20, 2021
5 Best Firewall Apps for Mac Owners in 2021
Best overall: Little Snitch
Best value: Lulu
Easiest to use: Radio Silence
Most powerful: Murus
Best balance of cost and features: Vallum
Before buying a firewall for your Mac, you first have to decide whether you actually need one. Instinctively, you might think so. But macOS comes with a firewall built in - and by default, it’s turned off. Has Apple lost its mind or something?
The answer is ‘something’. Specifically the fact that Mac users generally don’t need any extra firewall software to be enabled. That’s partly due to the fact macOS doesn’t run services that listen for network connections. On top of that, your router will also have its own firewall, so in most cases you don’t need any extra protection. The combination of these factors is why Apple doesn’t make a big deal about the macOS firewall.
But there are times when a firewall app can be a handy thing to have on your Mac. One such case is when you’re connected to a public network - for example, if you hook your MacBook up to wi-fi in a hotel. In that scenario, you might be at risk of poor security or even a fake network.
Another good reason to use a firewall is to control which Mac apps can connect to the internet. That includes malware, which may try to send your data to hackers. The macOS firewall isn’t built to do this, but it is possible with PF (Packet Filter), macOS’s more advanced firewall that can only be controlled via the Terminal command line. If you want something more user friendly, you’ll need a third-party firewall.
Install Little Snitch, and whenever an app tries to connect to the internet, you’ll get a notification. You can then choose whether to allow the connection or to block it. And you can apply that decision once, or until you restart your Mac, quit the app or log out. You can also set it for a certain period of time or permanently.

When you choose to block or allow an app access to the internet, Little Snitch creates a rule. You can then edit these rules in the Little Snitch client. These rules are based not only on the app that’s trying to connect to the internet but also the domain it’s trying to connect to. So you could allow an app to connect to certain servers but not others.

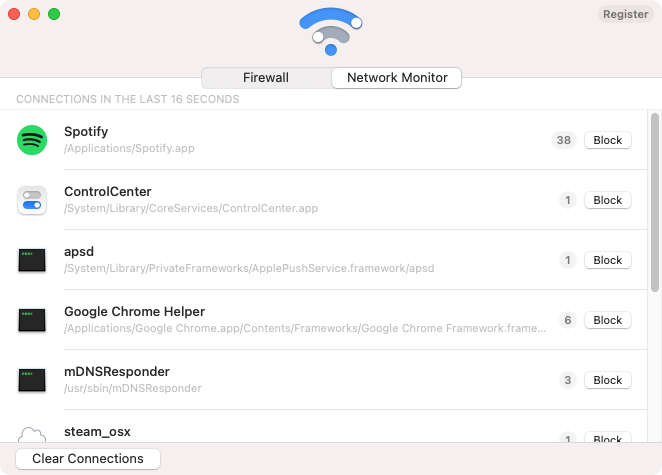
Using Little Snitch’s built-in Network Monitor, you can view and analyze any processes that are showing network activity. And you want to avoid notifications, you can run Little Snitch in Silent Mode, which will allow or deny all connections. Although the focus is very much on outgoing connections, Little Snitch can also control incoming connections to a lesser degree.
The only snag is the price. It’s a little expensive but worth it if you need total control.
Little Snitch at a glance:
Pros: Lots of options that put you in control
Cons: A bit pricey and maybe too advanced for beginners
Price: From $45 for a single license
Trial: 30-day demo
Developer: Objective Development
Official website: obdev.at
 Lulu
LuluLulu works in pretty much the same way as Little Snitch. When it’s enabled, you receive notifications whenever an app tries to connect to the internet. You can then block or allow the connection, either temporarily or permanently. Lulu can either apply the rules based on processes or on the domain level.

After that, you can head into the app to edit your rules. As well as changing the block or allow status, you can delete rules altogether or add domains or ports to the rules. You also get a network monitor, so you can keep an eye on what Mac apps are doing what in real-time

Make no mistake: Lulu doesn’t offer the same level of control as in Little Snitch. But it also doesn’t cost $45. In fact, it costs nothing at all. It’s a completely free, open-source app.
Lulu is only meant to block outgoing connections, but you could pair it with the macOS firewall if you’re worried about incoming connections. It can run in a few different modes: Passive, Block and no icon. Block stops all traffic, while passive applies only existing rules.
Lulu at a glance:
Pros: Does a good job and is completely free
Cons: Not much control over temporary rule
Price: Free
Trial: N/A
Developer: Objective-See
Official website: objective-see.com
 Radio Silence
As its name implies, Radio Silence doesn’t make a big fuss. There are no notifications, prompting you to block or allow apps to access the internet. Instead, this stripped-back app does two things: it enables you to see what apps and processes are running on your Mac, and it lets you block them.
Once you’ve blocked an app, you go into the settings and delete the rule. But that’s pretty much it. You can’t edit the rules in any way, and you can’t apply them under set conditions. Apps are either allowed to go online or they’re not.

Although limited, Radio Silence is ideal if you only want to block one or two apps and allow everything else through. Plus it’s cheap, with a single licence costing just $9. Pay $49 for the team licence, and there’s no limit on users.
Radio Silence at a glance:
Pros: Simple and cheap
Cons: Very basic blocking features
Price: From $9
Trial: 24 hours
Developer: Juuso Salonen
Official website: radiosilenceapp.com'
 Vallum
Just like Little Snitch and Lulu, Vallum intercepts outgoing connections from your Mac’s various apps. But you can also set rules for inbound activity too.

When an app tries to connect to the internet, you get a notification. As with Little Snitch, you can apply rules once, forever or for preset times, like five minutes, the rest of the day or until reboot You can also configure elements of your rule, like target hostname or IP, port, protocol, and even the user. Once a rule has been created, you can edit and apply more advanced criteria. Stick to the basics, though, and it’s not difficult to use Vallum effectively.

Vallum’s interface is a little confusing, but it’s a powerful app, and it comes at a great price. Starting from $15 for a single licence, it’s much cheaper than Little Snitch, despite sharing many of the same features. It can also be bundled with its sister app, Murus, a powerful front-end for macOS’s built-in firewall and Packet filter.
Vallum at a glance:
Pros: Powerful despite the relatively low price
Cons: A bit confusing to get set up
Price: From $15
Trial: Unlimited trial, with popup reminder every four hours
Developer: Murus.it
Official website: vallumfirewall.com
 Murus Pro
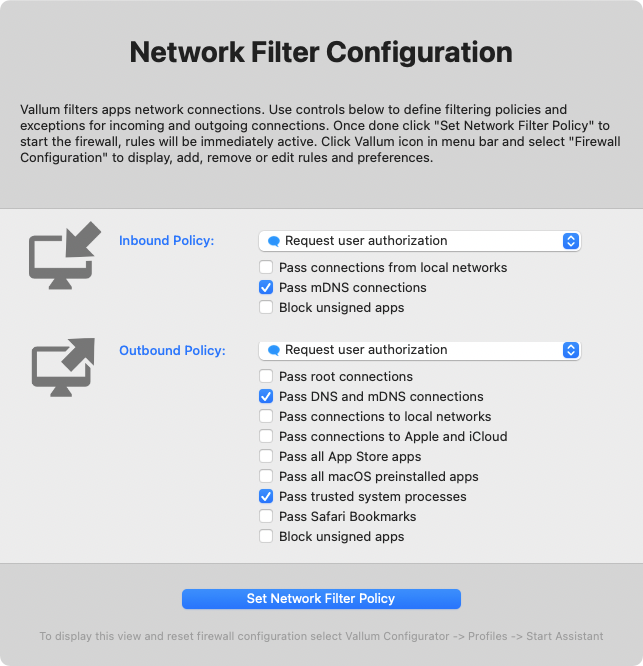
Murus is much more than just a simple connection blocker. The free Lite version only deals with inbound connections, but upgrade to Murus Basic or Pro, and it’s a completely different ball game. Not only can you configure rules for inbound and outbound connections, you have access to advanced filtering, port management, bandwidth management and much more.

If anything, Murus Pro is too powerful. The number of features and settings in the pro version is dizzying. While some users may benefit from features like port knocking, adaptive firewall, NAT and so on, most ordinary uses risk being overwhelmed. The Network Filter Configuration wizard helps a bit, though. And to be fair to Murus, it’s much easier to use than typing commands into Terminal.
Provided you know what you’re doing, though, Murus Pro is definitely worth checking out - especially as it comes with Vallum bundled in with it. It’s certainly not for the light-hearted, but if you want serious control over your Mac’s inbound and outbound connections, Murus Pro could be right for you.
Before you buy either Murus Pro or Vallum, though, you should know Murus.it has also released a hybrid firewall app called Scudo. This is designed as an alternative to both Muros and Vallum. At the moment, it’s in beta, so you might want to wait for a full release before buying it.
Murus Pro at a glance:
Pros: A rich feature set at a good price
Cons: Possibly too complicated for beginners
Price: From $10
Trial: Unlimited trial, with saving disabled
Developer: Murus.it
Official website: murusfirewall.com
What to look for in a Mac firewall
When choosing a Mac firewall, one of the first things you should consider is what you need it for. Key things to think about include:
- Whether you want to control inbound, outbound, or both types of connection. The macOS firewall is focused on inbound connections, and you need to use Terminal commands or a third-party app if you want to do more.
- Ease of use. If you can set up new rules without digging through tons of different menus, that’s ideal. More advanced software is great, but if you don’t know what you’re doing, it’s only likely to confuse you.
- How much control you get over rules. Some apps only let you block apps, with no more options than that. Others enable you to see more specific rules, like particular domains that are blocked or allowed.
- Cost. If you’re happy with the features in a free or low-cost firewall for your Mac, why spend more?
Which Mac firewall is the best in 2021?
Because Mac users don’t usually need firewalls to protect them from inbound connections, application-level firewalls that stop outbound connections are generally the best choice. Little Snitch is excellent but expensive. Radio Silence, meanwhile, is cheap and easy to use but offers limited control. Vallum does a good job too, and it’s substantially cheaper than Little Snitch. For many people, however, Lulu is more than good enough, and it’s completely free.
That said, none of these Mac firewalls are overly expensive, and they’re all great in their own particular ways. They all have free trials, and we strongly recommend trying them out before making a purchase.
FAQ
Do Mac owners need to use a firewall?
Usually, no. That’s why the built-in one is turned off by default. macOS isn’t generally vulnerable to rogue incoming connections, and most people have a firewall enabled on their router anyway.
How do you enable the macOS firewall?
To turn on the macOS firewall, head to System Preferences, and select Security & Privacy. Click the Firewall tab, then click the padlock near the bottom. Enter your username and password, so you can make changes in System Preferences. Now click Turn On Firewall. You can configure it by clicking the Firewall Options and Advanced buttons. You can also control Packet Filtering using text commands in Terminal.
Software Expert
I've been using Macs for both work and leisure for more than 15 years, starting off with a second-hand G3 iMac running OS 9.


![Best AI Detector Tools [5 Powerful Solutions]](https://static.macupdate.com/app-gallery/215/d/phpuzudv2-main-image.jpg)

