
15 February 2021
How to Uninstall TeamViewer on Mac
TeamViewer is a desktop application that runs on both Mac and Windows and allows you to connect to and have remote access to any other machine also running TeamViewer.
This comes in handy if you need to remotely access another computer or want to offer someone technical support but can’t be there in person to do so.
Below are multiple ways to uninstall TeamViewer and remove it from your Mac. If TeamViewer won’t uninstall, try another method from the list below as one of them should work for you.
How to Completely Uninstall Teamviewer from Mac
Using the Built-In TeamViewer Uninstaller
Teamviewer comes with an uninstall feature that is built right into the application itself. The benefit of using this method of removing the app is that it will delete all files associated with the application.
This is one of the only methods to fully uninstall everything associated with TeamViewer:
Step 1. Launch Teamviewer on your Mac.
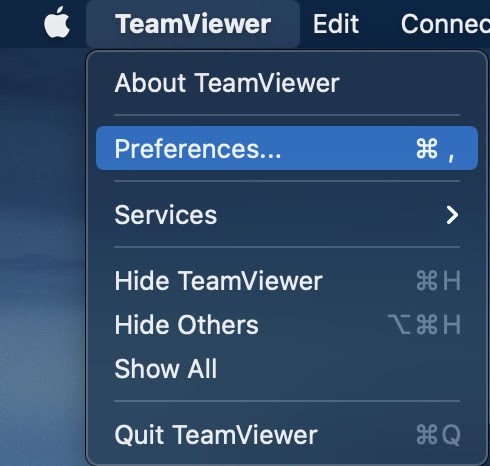
Step 2. Once Teamviewer has been launched, go to Preferences. Pro tip: you can go to Preferences by pressing the keys Command + ⌘ (without the “+” sign).
Step 3. Once in Preferences, you will want to go to the Advanced tab and then scroll down and look for the Uninstall option at the bottom. If you’re trying to do a clean uninstall, you will want to select, “Also delete configuration files” and that will remove any other additional files you have associated with Teamviewer.

Step 4. After you click on “Uninstall, Teamviewer will then start removing the files that are associated with it and you will see this message. This will delete Teamviewer and all associated files with it.

How to Remove Teamviewer Using the Terminal
The Terminal can be daunting to use at first if you don’t have prior experience with it. However, it can be a very powerful tool that doesn’t require you to go through a ton of steps to accomplish things. This is a perfect way to manually uninstall TeamViewer.
We can use the Terminal to uninstall Teamviewer and the best part is, it only takes one line of code to do so.
Note: The Terminal is a powerful tool and not typing things correctly into it can cause the incorrect file to be removed from your Mac. The Terminal does what you tell it to do and won’t ask you to confirm your command. Once you hit enter, it will remove whatever you had typed into the Terminal window and will not put it into the trash first, it is gone forever. It is best to make sure you have typed everything correctly to avoid deleting the wrong application.
Step 1. Launch the Terminal.

Step 2. Type in “sudo rm -rif /Applications/TeamViewer.app” (without the quotations).
Step 3. You will then need to put in your administrator password. This would be the password that you use to unlock your Mac or make changes to it. When you type in your password, it won’t show up within the Terminal window either.

Step 4. After you have typed in your administrator password, double-check that you typed in the correct app name and hit the Return key on your keyboard. Teamviewer will now be removed and you can note that there is no confirmation message letting you know.
To confirm that the application has been removed, go to your Applications folder and see if the app is still there. If you don’t see it listed anymore, then the uninstall was a success. If you’re still seeing it listed, double-check that you typed everything correctly and try again. You can also try another method from this article.
Using Finder to Uninstall TeamViewer
The Finder is the central hub of your Mac. It uses windows to display the information that you use every day on your computer. This includes things such as applications, documents, photos, and any other type of file.
It is an amazing tool for organizing your data but can also be used to remove applications once we’re done with them and no longer need them.
Step 1. Launch Finder.
Step 2. Navigate to your Applications folder and find TeamViewer.
Step 3. Right-click on TeamViewer and choose to Move to Trash from the contextual pop-up menu.

Step 4. You will have to either put in your administrator password or if you’re using a new MacBook laptop like I am, you can scan your fingerprint to confirm that you want to uninstall the application.
There are many ways to uninstall TeamViewer and most of the methods above can be used for almost any application on your Mac. Uninstalling applications that we’re no longer using helps keep our Mac fast and frees up storage space for other things we want to save to our hard drive.