


19 January 2023
Mac Terminal Commands and Tricks List
What is a Terminal on Mac?
Some MacOS users might be intimidated by the Terminal and its commands. When using Terminal on Mac, it might look like you are trying to hack into a system. While of course, it is not the case, knowing Mac Terminal commands will give you an upper hand in mastering the MacOS environment.
As a Terminal emulator, it provides you with text-based access to the operating system. It’s a quicker way of navigating the operating system, provided that you are familiar with the Terminal commands on Mac. Once you grasp its basic functionality you can take on more complex tasks and when you do so, using the Terminal can be a lot of fun.
While you will not be a IT specialist right away by knowing your way around the Terminal, it’s the first step to becoming one - if that’s your goal...
How to open the Terminal on Mac?
The Terminal application is in the Utilities folder in Applications. There are several ways you can access Terminal.
In Finder, navigate to the location of the Terminal application which is:
Applications > Utilities > Terminal
An alternate method is from Spotlight Search. Push command and space buttons together to bring up the Spotlight Search bar. Type in the word Terminal and click on the first suggestion.
Either of these two methods will bring up the Mac command prompt and it will look like a black box as below.

Depending on your Terminal setting, the appearance may look different. First, it’s best if you adjust the appearance to fit you. Changing the theme of the Terminal lets you do just that.
While on Terminal, navigate to ‘Terminal’ on the top bar and select Preferences.

In the preferences menu, navigate to the Profiles tab.
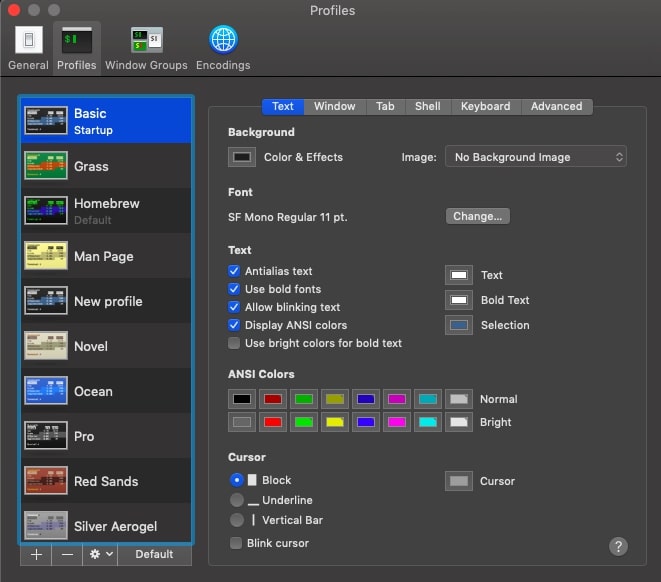
Here, you can customize the appearance of the Terminal including the background color, text color, and font.
Terminal tricks you should know
Navigating the Terminal might not be as straightforward as navigating a GUI application. Therefore it’s important that you learn a few things that you should keep in mind when learning the Terminal.
-
Use the arrow keys or the mouse to navigate the Terminal. If you want to edit the command you entered, move left or right using the arrow keys until you reach the place where you would like to edit. Another option is to use the mouse—ALT-click to move the cursor to a certain position in the line.
-
Once you have entered several commands and you would like to enter one of those commands again, you can use up and down arrow keys to navigate through the past commands you have entered until you select the desired command. This way you do not have to type the same command over and over again.
-
Terminal commands should be typed exactly as they are shown. Every character, every space, and every symbol matters. Removing any characters will give you an unexpected result.
-
Once you enter a command, to execute it you need to press the return/enter key. Once you hit the return/enter key, you can interrupt the command by pressing CTRL + C simultaneously. This will stop the command from completing its task.
-
The commands you run on the Terminal will execute in the current file location. To change the file location, you will use the Terminal command introduced below.
Mac Terminal Commands List
There are tons of commands that you can make use of. Let’s focus on some of the most common MacOS Terminal commands you need to be familiar with when you are mastering the Terminal.
Basics
There are a few features that are applicable for any command.
|
man [command] |
If you do not know what a command does or what a specific parameter related to a command does, the manual (man) page will provide you with all the information you need. |
|
. |
Current Directory. Wherever you are required to enter a directory location, this will refer to the directory you are currently in. |
|
.. |
Parent Directory. Wherever you are required to enter a directory location, this will refer to the parent of your current directory |
|
* |
Wildcard. Anything that matches certain criteria. For example “*.jpg” means any file with the jpg extension. |
|
~ |
Home Directory |
|
clear |
Used to clear the space of your Terminal |
|
sudo [command] |
Some commands require you to be a superuser. In such cases, you can use this command to gain such privileges provided you are an admin of the system. You will be required to enter your administrator password to execute such commands. |
|
history |
The Terminal keeps a history of all the commands you have entered. This command will display all the commands you have entered. |
|
history -c |
Deletes the command history of the Terminal |
List Directory commands
These commands are the most commonly used set of commands. These are very helpful when you want to list the contents of a folder.
|
pwd |
Print working directory (Outputs the address of the current directory ) |
|
ls |
Displays the names of files and subdirectories containing in the folder |
|
ls -l |
Lists in the long format. Includes information like file mode, owner, group name and many more |
|
ls -al |
Lists detailed directory contents including hidden files. |
Change Directory commands
The following commands will let you change the directory that you are currently working in. This is especially useful when selecting the directory you want to run a command in.
|
cd |
Go to Home Directory |
|
cd [folder name] |
Change directory (If the directory you would like to navigate to is not in the current directory, the complete file address is required ) |
|
cd .. |
Move up to the parent directory |
|
cd ../.. |
Move up two levels (Could be extended to as many levels as possible by adding ../) |
|
cd ~ |
Go to Home Directory |
File and Directory management
Let’s look at how you can create, edit, and delete directories and folders.
|
mkdir <dir> |
Create a new subdirectory in the current directory |
|
mkdir <dir1> <dir2> <dir3> |
Create several directories at once. |
|
mkdir “<dir>” |
Create a folder with a space in its name |
|
rm -R <dir> |
Remove a directory and its contents |
|
cp -R <dir> <”newdir”> |
Copy a folder to another folder with spaces in its name |
|
touch <file> |
Create a new file |
|
nano <file> |
Opens a Terminal file editor. You can make changes to your files right from the Terminal. |
|
cp <file> <dir> |
Copy a file to a directory |
|
cp <file> <newfile> |
Copy a file to the current directory with the name given as <newfile> |
|
rm <file> |
Remove a file completely. This will remove it completely from the system so be careful when using this command. |
|
rm -i <file> |
Deleting a file after providing confirmation. |
|
mv <file> <newfile> |
Move a file to another file/ Rename a file |
|
mv <file> <dir> |
Move a file to a folder and will overwrite existing files |
|
mv *.txt <dir> |
Move all text files of the current folder to a different folder |
Relevent reading: How to correctly uninstall apps on Mac
Permission Management
Changing permissions of files and folders is important to prevent unauthorized access to the resources. You can provide permissions for reading, writing, and executing to the owner, a group or others.
To view permissions of a file you can use ls -l command that we talked about in the List Directory commands section. This will list all files and folders in the long format. On the left-most column, you will see a notation as below.
rw-r--r-- OR drw-r-xr-x
There are nine slots with three groups for each type of user; owner, groups, and others. In the first example rw-r--r--, the owner has read (r) and write (w) permissions but has no execute (x) permission. Both groups and others only have read (r) permission.
In the second case, drw-r-xr-x, apart from the usual permission sets there is a d which represents that this is a directory.
Before moving on to the commands, you have to be familiar with octal permission notation
|
No permission |
Execute |
Write |
Write and Execute |
Read |
Read and Execute |
Read and write |
Read, Write and execute |
|
0 |
1 |
2 |
3 |
4 |
5 |
6 |
7 |
|
--- |
--x |
-w- |
-wx |
r-- |
r-x |
rw- |
rwx |
The Terminal application allows you to set octal notation permissions for files and directories. Let’s look at what commands you can use.
|
ls -l |
View permissions of a file or directory |
|
chmod 500 <file> |
Change the permissions of a file to 500 (r-x------) |
|
chmod -R 600 <dir> |
Change the permissions of a folder and its contents (drw-------) |
|
chown <user> <file> |
Change the owner of the file |
|
chown <user>:<group> <file> |
Change both the owner and the group of the file |
Process Management
The Terminal allows you to view the processes that are currently running on your system, examine their resource usage, and kill them. These commands basically act as a replacement for the Activity Monitor GUI application.
|
ps -ax |
Gives you a detailed view of every process that is running in the system. It includes information like the PID (Process ID), elapsed time running, the process name, and location. |
|
ps -ax | grep <application name> |
Allows you to view information about a specified application. The pipe symbol (|) takes the output from the first command and provides it as an input to the grep function. |
|
top |
Displays real-time information about the processes that are running on the system |
|
kill PID |
Once you find the PID from the ps -ax command, you can kill the process using this command. |
Network Management
While all the above tasks could be achieved using GUI applications, the easiest and the most convenient way to configure your network and gather information about your network is through the Terminal.
There are several useful Terminal applications that will help you in this regard.
|
ifconfig |
While there are many uses for this command, the most common is to check your IP address |
|
ping <host> |
Test whether you can make a connection to the host. The host could be the IP address of a device connected to your network or a web domain |
|
netstat |
Lists all your current incoming and outgoing connections. |
|
whois <domain> |
The output is the whois info of the domain. The information includes basic contact details, Name Servers, and much more |
|
arp -a |
View a list of all active devices on your local network. It will show you the IP and MAC addresses of all the devices. |
|
traceroute <host> |
This is an important troubleshooting tool. It traces the path, packets go through. If your connection with the host is not established, you can pinpoint the exact location at which the packets do not pass. |
|
curl -O <url to file> |
If you need to download a file from the internet without a browser curl gives you the option to download over HTTP, HTTPS or FTP |
Search commands
Searching through your Mac is easy using the command line using the following commands.
|
find <dir> -name <file> |
Find the file in the specified directory |
|
find . -name “*.jpg” |
Find all files with the jpg extension in the current directory. |
Determining File Type
Sometimes the extension will not help you in determining the type of file. In that case the following command can help you pinpoint the exact type.
|
file <file> |
Determines file type |
Conclusion
We explored some of the most useful commands available in the Terminal. There are a plethora of commands available to fulfill any task you can think of. While it’s not easy to remember every command in detail, it’s important to be familiar with the most used commands that are mentioned above.
If you are aspiring to become an IT specialist, knowing your way around the Terminal is one of the most basic skills that you would have to acquire. Now that you have grasped the basics of the Terminal, we hope that you will dig deeper and master the most useful tool in your IT toolbox.
Written by Shanika Wickramasinghe.
Shanika is a software engineer by profession and a Graduate in Information Technology. Her fortes are Web and Mobile Development. Shanika is a macOS enthusiast and loves writing as it helps to share her knowledge. She also enjoys sharing tips and tricks about macOS. You can connect with her at LinkedIn.


![How to Setup and Use a VPN on Mac [2020 Edition]](https://static.macupdate.com/app-gallery/60/d/vpn-on-mac-large-main-image.jpeg)